Aug 30th, '12, 22:58
Posts: 20891
Joined: Apr 22nd, '06, 20:52
Scrolling: scrolling
Location: Back in the TeaCave atop Mt. Fuji

Sep 5th, '12, 12:58
Posts: 252
Joined: Jun 3rd, '09, 21:52
Location: Homer, New York
Contact:
T-session
Re: Wood Fired Ceramics by Bill Perrine (Split-Fire Pottery)
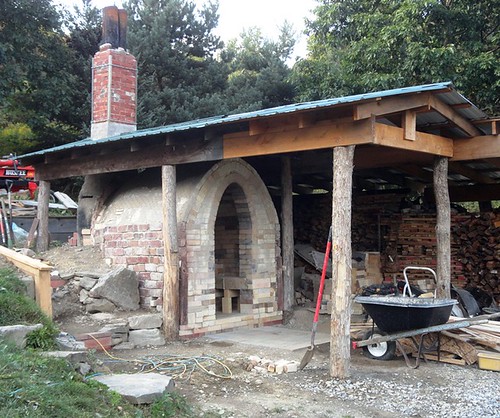
Thanks Chip, Debunix, John and Paul. I have an update. It's looking better all the time. I have some ladies (docents) from the Everson museum coming tomorrow to check out my setup for future trips for groups from the education/outreach program. 
Here are the newest pics ...
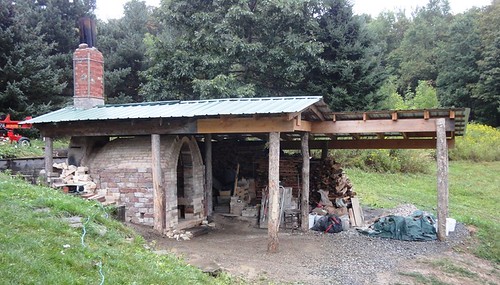


I have the last bricks on order, they have to ship them from Maryland. That will finish the top of the chamber off. Then I will put IFB's (insulated fire bricks) above the pavers as insulation then the final covering/cap. I will weld the iron work frame in place and ... well... then grading, laying the patio blocks, cleaning up... it never stops. Oh yeah, then throwing more pottery
Cheers,
Bill
Here are the newest pics ...
I have the last bricks on order, they have to ship them from Maryland. That will finish the top of the chamber off. Then I will put IFB's (insulated fire bricks) above the pavers as insulation then the final covering/cap. I will weld the iron work frame in place and ... well... then grading, laying the patio blocks, cleaning up... it never stops. Oh yeah, then throwing more pottery
Cheers,
Bill
Sep 6th, '12, 12:58
Posts: 1796
Joined: Sep 15th, '09, 16:11
Location: Wilton, New Hampshire USA
Re: Wood Fired Ceramics by Bill Perrine (Split-Fire Pottery)
That is a far better design that that manabigama thing you had. I think you'll be VERY happy you made the change.
Looking good.
best,
.....................john
Looking good.
best,
.....................john
Sep 6th, '12, 14:25
Posts: 5896
Joined: Jan 10th, '10, 16:04
Location: Los Angeles, CA
Contact:
debunix
Re: Wood Fired Ceramics by Bill Perrine (Split-Fire Pottery)
Looking forward to see what comes out of this!
Sep 6th, '12, 21:38
Posts: 252
Joined: Jun 3rd, '09, 21:52
Location: Homer, New York
Contact:
T-session
Re: Wood Fired Ceramics by Bill Perrine (Split-Fire Pottery)
Thanks John and Debunix,JBaymore wrote:That is a far better design that that manabigama thing you had. I think you'll be VERY happy you made the change.
Looking good.
best,
.....................john
I couldn't agree more. I have the wide firebox like a noribigama, the ash dispersing abilities and heat constrictions of an anagama and "walk-in to load" settings in the design. I will have the first two stacks basically doubled, where my best stuff comes from and no more cool top back corner because ... there is no top back corner any more.
The folks from the Everson Museum came out today and LOVED my set up! They wondered how many people I could stand at a time. They hoped 20 wouldn't be too many at once. They booked a group visit for the middle of October already. They warned me it's not good to be popular with the Everson, saying that there will be groups that want to come out all the time! The view, our country home, the studio and kiln, all make it a wonderful experience! Not too shabby, huh?
Sounds like a win - win to me !
Cheers always,
Bill
Sep 11th, '12, 19:05
Posts: 20891
Joined: Apr 22nd, '06, 20:52
Scrolling: scrolling
Location: Back in the TeaCave atop Mt. Fuji
Re: Wood Fired Ceramics by Bill Perrine (Split-Fire Pottery)
Sounds like an incredible opportunity, Bill. If they become troublesome, how many can you fit in that spacious rebuild? 
Sep 11th, '12, 20:50
Posts: 252
Joined: Jun 3rd, '09, 21:52
Location: Homer, New York
Contact:
T-session
Re: Wood Fired Ceramics by Bill Perrine (Split-Fire Pottery)
Chip wrote:Sounds like an incredible opportunity, Bill. If they become troublesome, how many can you fit in that spacious rebuild?
shhhh......probably 5 or 6... depends on their size
Last edited by T-session on Sep 13th, '12, 10:51, edited 1 time in total.
Sep 12th, '12, 00:56
Posts: 20891
Joined: Apr 22nd, '06, 20:52
Scrolling: scrolling
Location: Back in the TeaCave atop Mt. Fuji
Re: Wood Fired Ceramics by Bill Perrine (Split-Fire Pottery)
Well, I meant just so they could see the inside first hand  ... I did not say anything about lighting it.
Sep 12th, '12, 11:33
Posts: 1796
Joined: Sep 15th, '09, 16:11
Location: Wilton, New Hampshire USA
Re: Wood Fired Ceramics by Bill Perrine (Split-Fire Pottery)
Don't mess with the TeaChat Moderator!T-session wrote:Chip wrote:Sounds like an incredible opportunity, Bill. If they become troublesome, how many can you fit in that spacious rebuild?
shhhh......probably 5 or 6... depends on their size
Sep 13th, '12, 10:54
Posts: 252
Joined: Jun 3rd, '09, 21:52
Location: Homer, New York
Contact:
T-session
Re: Wood Fired Ceramics by Bill Perrine (Split-Fire Pottery)
Of course I wouldn't light it!!!! .... well maybe a little 
Sep 18th, '12, 08:47
Posts: 252
Joined: Jun 3rd, '09, 21:52
Location: Homer, New York
Contact:
T-session
Re: Wood Fired Ceramics by Bill Perrine (Split-Fire Pottery)
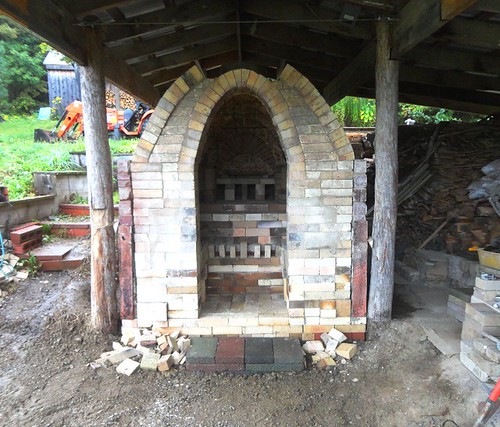
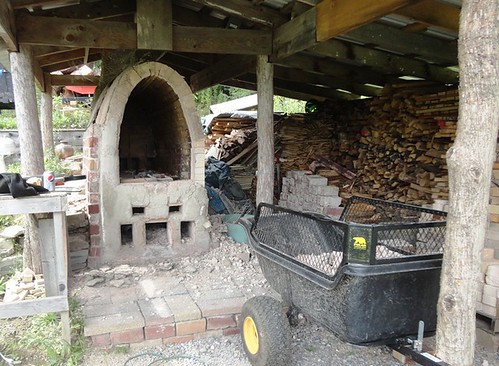
I'm getting closer. Here is my latest progress. Almost ready to weld up some steel. I've got the insulated bricks on.
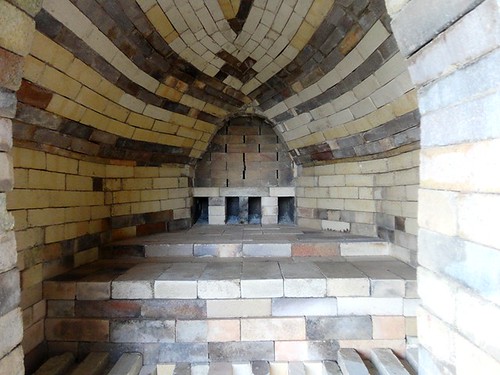
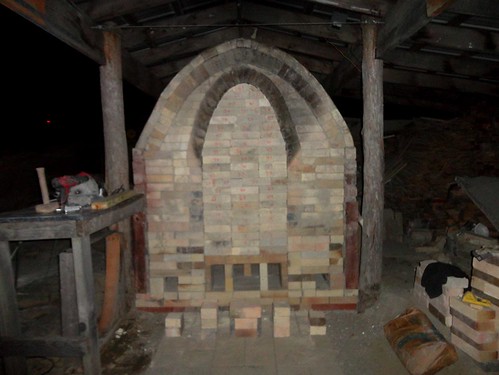
This is the interior, a combination of new and used bricks from the previous kiln. The darkest ones were closest to the firebox and the dark ivory colored ones were near the back. The off white ones are new.
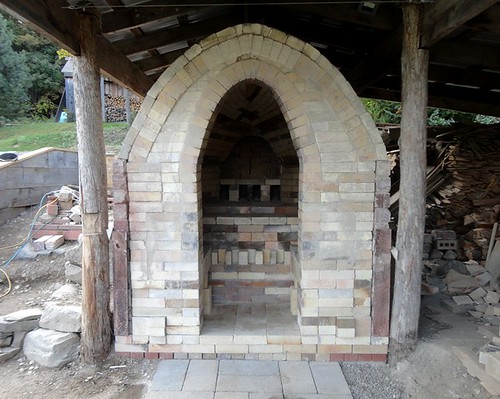
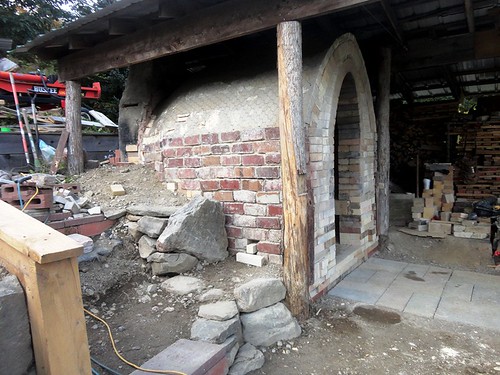
Here you can see the chicken wire on top, ready for the final capping. Also the rock buttressing is in place and steps are started.
Shaping up! I will be able to stand up inside of this one and no more climbing and crawling in and out to load or unload.
This is the interior, a combination of new and used bricks from the previous kiln. The darkest ones were closest to the firebox and the dark ivory colored ones were near the back. The off white ones are new.
Here you can see the chicken wire on top, ready for the final capping. Also the rock buttressing is in place and steps are started.
Shaping up! I will be able to stand up inside of this one and no more climbing and crawling in and out to load or unload.
Sep 18th, '12, 10:05
Posts: 5896
Joined: Jan 10th, '10, 16:04
Location: Los Angeles, CA
Contact:
debunix
Sep 18th, '12, 21:59
Posts: 252
Joined: Jun 3rd, '09, 21:52
Location: Homer, New York
Contact:
T-session
Re: Wood Fired Ceramics by Bill Perrine (Split-Fire Pottery)
I'm not getting any younger! Crawling in and out of the other one wasn't real bad but as I get older, it would have been a pain. 60 isn't that far away!
This
is now
...and no front wall to crawl over!
This
is now
...and no front wall to crawl over!
Sep 20th, '12, 21:14
Posts: 252
Joined: Jun 3rd, '09, 21:52
Location: Homer, New York
Contact:
T-session
Re: Wood Fired Ceramics by Bill Perrine (Split-Fire Pottery)
Door bricks are in/cut. Hard brick inside layer, soft insulating brick outside. Five primary air openings are at the bottom of the door, one large one in the middle, two medium ones on each side of it and two smaller square ones near the outer corners. These will be adjusted (blocked up or opened) as needed during the firing to allow air to the embers which will increase the heat to that corresponding section. We want an "even" firing.
I made a smokey fire to soot up the door opening so when I was grinding each brick to fit, I could get a register on it where it was still rubbing, like the dentist does with that little dark strip of black paper when he or she is checking your "bite"...
I made a smokey fire to soot up the door opening so when I was grinding each brick to fit, I could get a register on it where it was still rubbing, like the dentist does with that little dark strip of black paper when he or she is checking your "bite"...
Oct 2nd, '12, 20:04
Posts: 252
Joined: Jun 3rd, '09, 21:52
Location: Homer, New York
Contact:
T-session
Re: Wood Fired Ceramics by Bill Perrine (Split-Fire Pottery)
I am getting close with the kiln!!!  (Sorry it's been a lot of work!) I got all the welding done today and started cleaning up even. All I need to finish up is mortaring the buttressing boulders in place and finishing the steps I moved over.
Here is the door and some frame details. I added a sliding door using the same hardware that my barn door has. There are wheels in the track above. The door is a chunk of kiln lid with Kaowool and then some stainless, recycled, kiln skin over it.
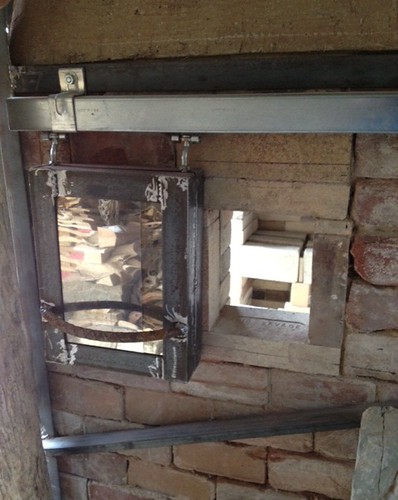

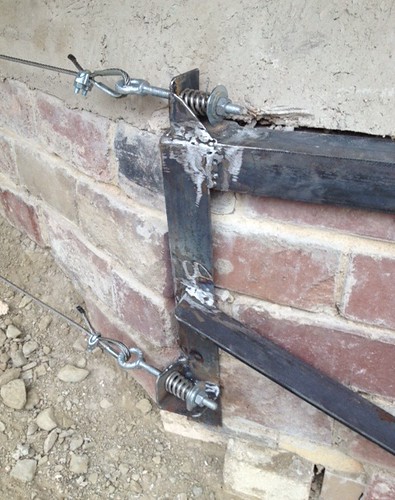
Cable with heavy springs for kiln expansion when firing.
More pics soon.
Cheers,
Bill
Here is the door and some frame details. I added a sliding door using the same hardware that my barn door has. There are wheels in the track above. The door is a chunk of kiln lid with Kaowool and then some stainless, recycled, kiln skin over it.
Cable with heavy springs for kiln expansion when firing.
More pics soon.
Cheers,
Bill