Jul 23rd, '13, 13:22
Posts: 13
Joined: May 22nd, '13, 22:34

Making a ceramic teaboat

by arcticfox » Jul 23rd, '13, 13:22

Hey everyone. I recall there were quite a few of you here that also made tea-related pottery, so I thought I'd see if I could get some guidance. My tea obsession has been fueling my newfound pottery obsession and I've been taking a class with the local pottery guild (just 1 beginner class, intro to handbuilding and throwing). That's over for the summer though and now I have a membership to the guild studio :P This stuff is really addicting!

I've been wanting to make my own ceramic teaboat since the start, but I'm not sure how to go about it, or what form would be reasonable to attempt for a beginner. This is something I'd definitely prefer to handbuild, as my throwing is still at the point of "get in the center you stupid lump of clay!", and I'm supposed to be practicing cylinders anyways.

Ideally, I'd like to make something like this: Image

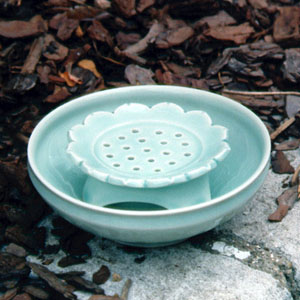
But with less detail and the outer bowl shape as a flower, and the inner plate/stand just round with drainage holes. I'm thinking of rolling some slabs, cutting out a base and petal shapes and piecing them together. Is that feasible?

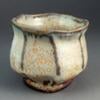
Alternatively I can try something like this: Image

But it wont look very good because I can't get it very smooth or round by handbuilding. Throwing something that big and wide is out of the question right now, especially since I don't have a teacher at the moment.

Another question I have about this is, can I leave most of it unglazed? It's white cones 6 clay (I have no idea what that means). I don't know if it's porous enough that liquid would seep out the bottom without glaze, but I could always just glaze the inside bottom. I kinda want to leave the rest of it to stain with tea, but that could turn out very nice or very ugly. I'm especially worried about the stand that the teapot would actually sit on because I don't want it to damage my yixing pot, so maybe that bit would get glazed as well. Are there any other concerns about leaving a piece like this unglazed?

User avatar
Jul 24th, '13, 22:08
Posts: 400
Joined: Jul 22nd, '09, 21:54
Scrolling: fixed

Re: Making a ceramic teaboat

by TomVerlain » Jul 24th, '13, 22:08

yixing is unglazed and used for tea boats as well as pots and other vessels, and I have no problem placing my teapots (unglazed) on mine. The surface is pretty smooth however. I have a hagi cup which is very rough clay, and it neither is damaged, nor damages my tea boat either.

Even if the "white cones 6 clay" is porous, you can use a tea tray or even a plate to catch any moisture that escapes. I can't imagine it leaking to the point of water everywhere unless there are actual holes the bottom basin part of it.

Though this might be out of the range of what you can do, a slip cast tea boat might be good, carve like a lotus flower (in negative) in plaster, cast and then place holes in the clay. Set in shallow bowl. You might even get a real lotus leaf and make plaster cast, etc.

Sound like fun what ever you do, I have toyed with the idea of try to take a pottery class to make my own tea ware too.

User avatar
Jul 29th, '13, 08:42
Posts: 132
Joined: Apr 4th, '12, 12:53
Location: Londonderry, NH
Contact: paul haigh

Re: Making a ceramic teaboat

by paul haigh » Jul 29th, '13, 08:42

If you roll out a slab and place it on a piece of foam rubber, then push down the middle with something round, the edges lift a bit to give you a shallow dish. Once it's leather hard, you can carve the lotus shape, cut holes, then add the feet (all should be joined at proper moisture, of course- pottery is 1/2 managing moisture, and 1/2 managing other frustrations).

Another way to make a shallow dish is using a hump mold (essentially laying a slab over an overturned bowl), or a slump mold- you can google or youtube these methods, and they can be made with the most common kitchen items.

Yet another method is to roll out a slab, then place coils under the edges to lift them, and let it stiffen in that position. This would be harder to get symmetry, if that is what you are shooting for.

User avatar
Jul 29th, '13, 09:35
Posts: 132
Joined: Apr 4th, '12, 12:53
Location: Londonderry, NH
Contact: paul haigh

Re: Making a ceramic teaboat

by paul haigh » Jul 29th, '13, 09:35

Oh, and a stoneware fired to maturity at cone 6 should be non-porous, so you should not need a glaze.

User avatar
Jul 29th, '13, 11:21
Posts: 4536
Joined: Apr 1st, '09, 00:48
Location: Bangkok

Re: Making a ceramic teaboat

by Tead Off » Jul 29th, '13, 11:21

This is a Korean Tea Boat/Tray that I sell on my TeaMerchandiser site. It sounds similar to what you describe you want to make and to the first one you illustrate in your post. You can use this as a 'guide' for your own creation. IMO, it will look much better glazed than unglazed.
Kim Eung Chul.jpg
Kim Eung Chul.jpg (18.79 KiB) Viewed 1714 times

Jul 31st, '13, 23:55
Posts: 13
Joined: May 22nd, '13, 22:34

Re: Making a ceramic teaboat

by arcticfox » Jul 31st, '13, 23:55

Thanks for the advice guys! I've already started it. I made the outside bowl by draping a slab into a large round fruit bowl I had, and the inside disc (stand? Platform?) by drying out a round slab and carving the flower shape into it (calling it a lotus would be overly generous, lol), and the wetting the edges and rolling them up by hand. It's not perfectly even and symmetrical but it looks ok if I eyeball it. I've carved out a groove in the large bowl for the feet of the platform to sit on, but I'm not sure what shape to make the feet so that a) it stands out of the water far enough, b) looks more or less even, and c) doesn't wobble.

User avatar
Aug 13th, '13, 09:42
Posts: 132
Joined: Apr 4th, '12, 12:53
Location: Londonderry, NH
Contact: paul haigh

Re: Making a ceramic teaboat

by paul haigh » Aug 13th, '13, 09:42

Anything that you give 3 feet will not wobble.

Aug 18th, '13, 17:26
Posts: 13
Joined: May 22nd, '13, 22:34

Re: Making a ceramic teaboat

by arcticfox » Aug 18th, '13, 17:26

I did end up putting 3 feet on it, and dug a circular groove into the bottom plate for the feet to rest in. Will post pictures next time I go into the studio. Now if only I can find someone to fire it for me...

+ Post Reply