The uriushi is working VERY well, it's a wonderful binding substance. (I happen to be immune to poison ivy, but I have my epi pen handy)--
the gold dust is a pain in the butt-- hard to control... I'll need to practice more (I'm just using the imitation dust first... I got it in the wrong spots... it stuck... I had to use turpentine to get it all off... a big pain!)
But now I'm trying again...
Apr 10th, '13, 00:25
Posts: 714
Joined: Feb 12th, '13, 16:21
Location: South Bronx, NYC
Contact:
futurebird
Apr 10th, '13, 15:19
Posts: 714
Joined: Feb 12th, '13, 16:21
Location: South Bronx, NYC
Contact:
futurebird
Re: Yixing repair attempt
Here is what I did over the past few days...

I had two cheap pots to repair. One witha cracked handle, the other with a cracked lid.

It is hard to make the gold (fake gold for now) go where I want it to go. The method relies on the smoothness of glazed pottery and isn't well suited to unglazed items... but with some modifications I was able to get the above clumsy result.

I had similar issues with the broken handle. But at least I can use these pots again! They won't gett any awards for beauty, but I'm glad to be learning.

I've washed my hands for and hour and they seem to be stained with urushi. That said, I think I'll keep practicing.
I had two cheap pots to repair. One witha cracked handle, the other with a cracked lid.
It is hard to make the gold (fake gold for now) go where I want it to go. The method relies on the smoothness of glazed pottery and isn't well suited to unglazed items... but with some modifications I was able to get the above clumsy result.
I had similar issues with the broken handle. But at least I can use these pots again! They won't gett any awards for beauty, but I'm glad to be learning.
I've washed my hands for and hour and they seem to be stained with urushi. That said, I think I'll keep practicing.
Re: Yixing repair attempt
Wow. A valiant first effort!
You'll find out within the next 24-48 hours if you really are immune to urushi/poison ivy. If you find out not, there is a product line of soaps, sprays, and salves called Technu that you'll want to be searching out.
You'll find out within the next 24-48 hours if you really are immune to urushi/poison ivy. If you find out not, there is a product line of soaps, sprays, and salves called Technu that you'll want to be searching out.
Apr 10th, '13, 18:56
Posts: 714
Joined: Feb 12th, '13, 16:21
Location: South Bronx, NYC
Contact:
futurebird
Re: Yixing repair attempt
It's been a lot longer than 48 hours since I was first exposed. It's been almost 3 days.. It's about a 4-day process, first the gluing, then filling gaps, then the gold ... the last being by far the most difficult.

Re: Yixing repair attempt
JB Weld seems a lot easier/cheaper to use. Finding the right gold powder or coloring would be the next step.
Apr 11th, '13, 05:07
Posts: 760
Joined: Aug 1st, '12, 08:20
Location: not anymore Bangkok, not really arrived in Germany
Re: Yixing repair attempt
futurebird wrote:... but with some modifications I was able to get the above clumsy result.
It still adds a lot of charm to the pots. Very nice!
What was the main problem with the gold powder? How do you apply it anyhow? Is it carefully spreading the powder over a wet/half dried surface of the lacquer, or is it by mixing it with lacquer and painting it on?
Last question: did you try the pots yet? Does the repair of the lid smell and taste neutral, or does it have a lacquer smell?
Apr 11th, '13, 23:51
Posts: 714
Joined: Feb 12th, '13, 16:21
Location: South Bronx, NYC
Contact:
futurebird
Re: Yixing repair attempt
Thanks RRB! 
The main issue is if you want the gold to be *flush* with the surface you need to leave some room for it. Butt the urushi-glue (first stage of repair) is so amazing there is no gap to fill, it's a hair-line.
The urushi has no smell at all when dry, though it has a funky pine/glue smell when wet. I like the strength of the glue, it's very powerful and not chemical-smelling.
I'd use the glue over anything else even if I skip the gold.
I'll have more repairs to post, but as if now I'm out of things to fix and I have itchy fingers. (not from the urushi lol) -- I just need something to fix...
Apr 12th, '13, 00:57
Posts: 760
Joined: Aug 1st, '12, 08:20
Location: not anymore Bangkok, not really arrived in Germany
Re: Yixing repair attempt
Thank you very much for the pics and all the information.futurebird wrote:
I'd use the glue over anything else even if I skip the gold.
I have an aversion against using epoxy on my tea utensils, i just want natural materials. I always liked the look of Kintsugi, but had no idea how to get access to this, or that i could do it myself as well.
Apr 12th, '13, 01:33
Posts: 714
Joined: Feb 12th, '13, 16:21
Location: South Bronx, NYC
Contact:
futurebird
Re: Yixing repair attempt
one disadvantage: it takes FOREVER to cure. It needs a moist environment (just put a wet rag in a cardboard box) this allows the resin to "plasticize" --
Anytime. I'm having so much fun with this. It's a little fiddly and I've made quite a mess in my craft area... but it's been worth it.
Anytime. I'm having so much fun with this. It's a little fiddly and I've made quite a mess in my craft area... but it's been worth it.
Apr 12th, '13, 02:15
Posts: 760
Joined: Aug 1st, '12, 08:20
Location: not anymore Bangkok, not really arrived in Germany
Re: Yixing repair attempt
futurebird wrote:one disadvantage: it takes FOREVER to cure. It needs a moist environment (just put a wet rag in a cardboard box) this allows the resin to "plasticize" --
Anytime. I'm having so much fun with this. It's a little fiddly and I've made quite a mess in my craft area... but it's been worth it.
I live in a moist environment, especially now since yesterday the first rain in weeks came, which has broken the unbearable heat, finally (YESYESYES!
Soon the rain season will come, and then i will be able to do stuff like that, where i can switch of the fan in the evenings without melting away (working with fine gold powder and a switched on fan could turn slightly problematic...).
Apr 12th, '13, 14:14
Posts: 714
Joined: Feb 12th, '13, 16:21
Location: South Bronx, NYC
Contact:
futurebird
Re: Yixing repair attempt
can't wait to see hou it urns out.

I fixed a nicked platte and tasting cup today.
I fixed a nicked platte and tasting cup today.
Apr 12th, '13, 16:15
Posts: 714
Joined: Feb 12th, '13, 16:21
Location: South Bronx, NYC
Contact:
futurebird
Re: Yixing repair attempt
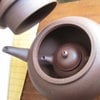
Also did this spout, it had chips missing.

building it up with urushi paste

after extensive sanding... sadly a chip is still missing-- I may go back and fix that.
I'm almost ready to try real gold...
Also, I need to remember to take "before" photos... in any case, this spout was broken off... the new tip is made of urushi and a kind of clay paste found in the kit.
this is a 100 ml pot to get an idea of the scale.
building it up with urushi paste
after extensive sanding... sadly a chip is still missing-- I may go back and fix that.
I'm almost ready to try real gold...
Also, I need to remember to take "before" photos... in any case, this spout was broken off... the new tip is made of urushi and a kind of clay paste found in the kit.
this is a 100 ml pot to get an idea of the scale.
Re: Yixing repair attempt
Futurebird,
While your effort is valiant, it becomes apparent there is a lot more skill and craft in doing this properly. I find most of the diy stuff I've seen on the web, pretty horrible using this kit. I've also seen great gold repair done where it looked like the actual ceramic was made that way. If I were you, I'd practice for quite some time before working on anything I really cared about.
I take it that you are sprinkling the gold powder over the semi-hardened urushi or when it is still wet? When you sprinkle or apply the powder to it, what makes it 'melt' into a liquified look?
Is the real gold powder, real gold powder unmixed with anything else?
I've thought of using gold leaf as it is readily available here in Thailand but if it is just laid down on the surface, there is nothing protecting the gold from being rubbed off in a fairly short amount of time from being handled and washed. In my mind, I visualize the best way of working with this or another adhesive is to have the whole thing mixed into the right colorization you want then apply it to the broken pieces and add or subtract while you go. What do you think?
Apr 13th, '13, 09:18
Posts: 714
Joined: Feb 12th, '13, 16:21
Location: South Bronx, NYC
Contact:
futurebird
Re: Yixing repair attempt
My photos are the only ones from this kit online. The makers of the kit have requested that people send photos, which I'll do once I get a result I find closer to perfect.
There is another American kit that basically uses epoxy or something covered in gold dust, it's very inexpensive, the result is not flush with the surface, it's not water proof or heat proof and you can't rebuild missing parts. I mentioned it further up in the thread.
This is something that takes practice. But the results can be undone. I'm re-doing the handle, for example since I wanted the amount of gold visible to be smaller.
The real gold powder is just that, but there is only a tiny bit of it in this kit.